
Behavior Trees are a common mathematical model of execution order or plan when writing for Artificial Intelligence most commonly in Games and Robotics. It is used in place of the Finite State Machine but has a some benefits over the FSM. The most important one is that it has the capability to be expanded into a big complex system. In Finite State Machine pattern, you have a finite pre-defined states and all the AI does is switch between these states. This will work well for AI which requires only a few states and nothing too complex has to be performed. But, lets say you want to write an AI that might have many tasks to perform, and you need to make multiple decisions, check for multiple situations or perform sequence of actions, then Behavior Trees are your friend.
In this post I will talk about Behavior Trees in general and then show you an example in Godot.
In Godot, you can implement your own Behavior Tree Pattern with custom code, or you can use someone else’s implementation of the Behavior Tree in the Asset Library.

For this article, I will be using Vinicius Gerevini’s implementation available here.

Download the zip and copy the addons folder to your own project folder.

Then go to the Godot menu > Project > Project Settings and in the Plugins Tab, locate the Behavior Tree Plugin and enable it.
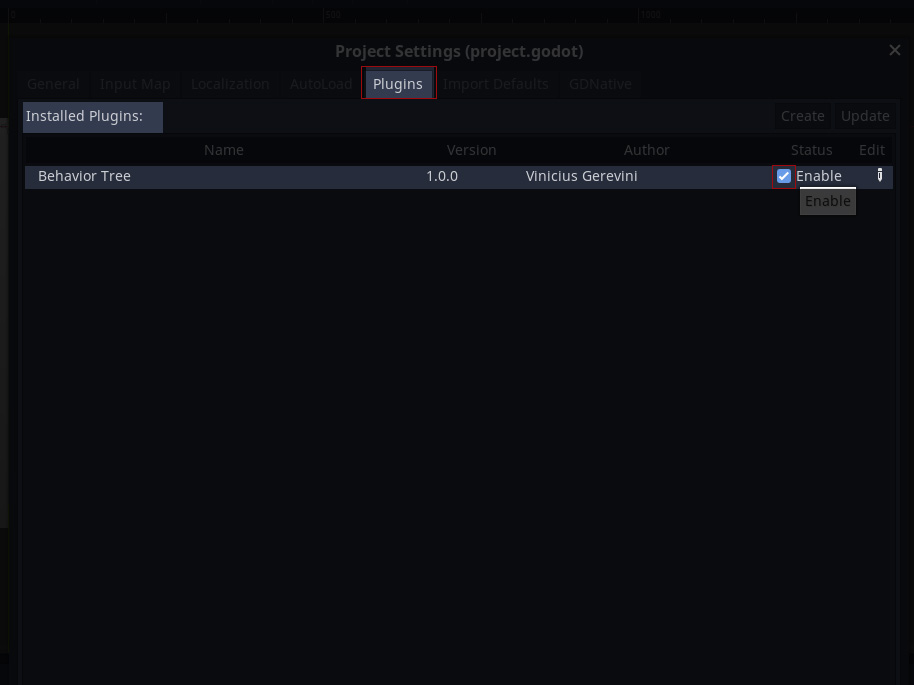
Once Enabled you will be able to find and use the Behavior Tree Nodes to any scene in this project.

Now once we are all set to experiment with our Behavior Tree Nodes in Godot, we can work on the very basic example. But, before we do that, let’s try and understand how behavior trees work.
Behavior Trees: How they work?
Behavior Trees have the instructions or code spread across it’s nodes in small chunks. You can add as many child nodes, and make complex tree structures and keep adding on to add more functionality, whenever required. This expandable feature makes them so popular with complex AI coding. If you want to add more functionality, you just have to add more nodes, if you want to change the existing functionality, you just need to modify the required nodes and not mess with the rest of the code.
The Behavior Trees have a tree like structure as the name suggests, each child node should perform only one task (predefined for composite nodes and custom code for leaf nodes) and should return only one result. Most common results used are:
- SUCCESS
- FAILURE
- RUNNING
There can be more result types, but the above 3 are more than enough for most situations.
Now, Let’s look at the different kinds of Nodes in Behavior Trees
Root Node: The Root Node is the Entry point to the Behavior Tree. This is where the processing of the rest of the tree begins. Ideally, you will need only One Behavior Tree per NPC (Non Player Character), but there can be situations, although rare, where you would like to layer your behaviors into different Behavior Trees
Composite Nodes: The Composite Nodes are the nodes that do not really have any code related to your AI, but act as organizers and decide which code will run and what will happen if a child node fails, succeeds or is running. Most implementations of Behavior Trees will have the code related to Composite Nodes already written in plugin code, so you don’t have to worry about it.
Leaf Nodes: These are the nodes which are at the end of any branch and have no more child nodes. This is where you will write your custom code to add behavior to the AI.
Let’s look at an example Behavior Tree
graph TD

R[Root Node] --> C1[Selector]
R --> C2[Sequence]

C1 ---> L1{{Condition}}
C1 ---> L2[Action 2]

C2 --> C3[Selector]
C2 ---> L3{{Condition}}
C2 ---> L4[Action 1]

C3 --> L5[Action 1]
C3 --> L6[Action 2]

style R fill:#7D6B7D,color:#fff

style C1 fill:#FF8C64,color:#222
style C2 fill:#FF8C64,color:#222
style C3 fill:#FF8C64,color:#222
style C2 fill:#FF8C64,color:#222

style L1 fill:#3EB595,color:#fff
style L2 fill:#3EB595,color:#fff
style L3 fill:#3EB595,color:#fff
style L4 fill:#3EB595,color:#fff
style L5 fill:#3EB595,color:#fff
style L6 fill:#3EB595,color:#fff
In the above diagram, we have one root node [purple], 3 Composite nodes [Orange] and 6 Leaf Nodes [Green]. The behavior tree is processed top to down, from left to right.
graph BT
R[Root Node]
C[Composite Node]
LA[Leaf Node]
LC{{Leaf Node}}
style R fill:#7D6B7D,color:#fff
style C fill:#FF8C64,color:#222
style LA fill:#3EB595,color:#fff
style LC fill:#3EB595,color:#fff
Composite Node Types
Selector: A Selector Node will process it’s first child first. If the first Child returns SUCCESS or RUNNING it will return that result to it’s parent and stop processing for that tick cycle. If the first child node returns FAILURE, then it will process the next child in line and wait for it’s result. As long it has more child nodes, it will continue this process. If all of it’s children return FAILURE then eventually it will return FAILURE to it’s parent and stop processing for that processing cycle.
Sequence: A Sequence Node will process each of it’s child nodes one after the other, starting from it’s first child node. It will keep processing the next in line child node as long as all the child nodes are returning a SUCCESS result. Once, all the child nodes are processed, it will return, SUCCESS to it’s parent. If any one of the child nodes return a FAILURE, it will abort the sequence processing for that cycle and return FAILURE as the result.
For now, the above two composite nodes are enough to understand. There are more composite nodes like Random Sequence, or Random Selector, but I will not be talking about them in detail in this post.
Leaf Node Types
Action Node: An Action Node is the node where you will write your custom code. Each Action Node should ideally perform one action only and return the result RUNNING/SUCCESS/FAILURE. You will be responsible for returning all the return options in your custom code.
Condition Node: A Condition Node is a Node that checks for one Condition and if the condition is True it should return SUCCESS. If the condition is false it should return FAILURE. A Condition Node should never return RUNNING because either the condition is satisfied or not satisfied. There is no third state.
Tick and Blackboard
Tick: Each processing cycle is called a tick. Each tick will process the tree one time, with a result of SUCCESS or FAILURE or RUNNING. In game development it is equivalent to _process() or _physics_process() methods in Godot Engine or Update() or FixedUpdate() methods in Unity Engine.
Blackboard: Blackboard is a concept where you can store values which can be used and updated from any node in the tree. This is where you will store certain values you have calculated and instead of recalculating them again and again in each node, you can access that value from any node.
Decorator Nodes
In addition to the Root, Composite and Leaf Nodes, there are Decorator Nodes which can be used to alter the results coming from each Node. At first they might seem redundant or useless, but there will be situations where they come in very handy. Some examples of decorator nodes are:
- Always Succeed: This decorator node, will always return a SUCCESS irrespective of what it receives from it’s child nodes.
- Always Fail: As you can tell, this node will always return a FAILURE, irrespective of what it receives from it’s child nodes
- Inverter: The inverter decorator will invert acts like an Inverter Gate. it will invert the result. If it receives SUCCESS it will send SUCCESS, and vice versa.
- Limiter: The limiter decorator node limits the number of times it is processed. This can be useful in cases where you do not want to process the subsequent child nodes after a few ticks.
Most of the times, I have found decorator nodes to be very useful for reusing code. I can use the same generic code in my script files and attach them to different nodes at different places and invert the results, or modify them as per the requirement.
Processing of the Behavior Tree
A Behavior Tree is processed starting from the Root Node. From the Root Node, it will process it’s first child Node. In the diagram the Selector Node will be processed first. The Selector will then in turn process it’s own first child, which in this case is the condition leaf node. If the condition returns SUCCESS then it will return it to the Selector Node, which in turn will return SUCCESS to the Root node. If the Condition returns FAILURE, then the Selector Node will process it’s next child node which is Action 2. If this node returns SUCCESS then the Selector will return SUCCESS to the root node.
After this Selector Node process is complete, the next node in line will be processed which in this case is a Sequence Node. The Sequence Node will execute it’s child nodes in order. If any one of the nodes returns a FAILURE, the sequence node will terminate processing and return a FAILURE to it’s parent.
To understand this better lets take a very simple example in Godot Engine. I have an ant as a character which will move towards the current mouse position, if the mouse is 300 pixels or less in distance from the ant. The ant will also rotate towards the current mouse position. If the mouse position is more than 300 pixels, the ant will stop moving. If the ant moves to the mouse position, then also it will stop moving.
AI Ant that follows the mouse if it is closer than 300 pixels
We will start with a 2D Scene and an ant KinematicBody2D Node, in which the Ant character will walk towards the mouse if the mouse is closer than some predefined distance (300 pixels in the case of our example). I will not get into the details of how to make your animated sprite and kinematic body ant in this tutorial, assuming you are familiar with the basics of Godot Engine.
The behavior tree would look something like below
graph TD
BTR[1. Root Node] --> SEL1[2. Sequence]

SEL1 --> CCOND1{{3. Is_Mouse_Close?}}

SEL1 --> CACTION1[4. Look At Mouse]

SEL1 --> DEC1[/Inverter\]
DEC1 --> CACTION3{{6. Is Ant at Mouse?}}

SEL1 --> CACTION4[Move To Mouse]

style BTR fill:#7D6B7D,color:#fff
style SEL1 fill:#FF8C64,color:#222
style CACTION1 fill:#3EB595,color:#fff
style CCOND1 fill:#3EB595,color:#fff
style DEC1 fill:#D29922,color:#fff
style CACTION3 fill:#3EB595,color:#fff
style CACTION4 fill:#3EB595,color:#fff
The processing of this behavior tree will start at the root node. Since our requirement for this example is very simple, the root node has only one child. We are only checking for one condition. If the mouse position is in range or not. My custom code in the Condition Node will return SUCCESS if the mouse_position is less 300 pixels away from the ant’s position.
func tick(actor, blackboard) -> int:
    var mouse_position = get_viewport().get_mouse_position()
    if actor.is_mouse_close(mouse_position):
        blackboard.set("mouse_position", mouse_position)
        return SUCCESS
    return FAILURE
Now every time the mouse is farther than 300 pixels from the ant, the node will return FAILURE, which will be sent to the parent Sequence node. I am using a custom function is_mouse_close() in the Ant_AI.gd script to perform the logic. The sequence node will abort further processing for this tick. But every time the mouse is closer than 300 pixels from the ant character, the condition will return SUCCESS, and the Sequence Node will then process the next child node in queue. I am also setting the value of the mouse position in the blackboard just to show how we can use the blackboard and retrieve or modify the value in any of the nodes.
If the mouse is in range, the next node will make the ant rotate towards the mouse_position. This node is the simplest code and has only one line.
func tick(actor, blackboard) -> int:
    actor.look_at(blackboard.get("mouse_position"))
    return SUCCESS
Although in the above example you can simply return SUCCESS, you can also attach an Always Succeed decorator node above it if you like.
After this the next child node will be processed, which is a condition node I will check if the ant is already at the mouse position or not. I am using an invert decorator just to show how the inverter will invert my result.
func tick(actor, blackboard):
    if position == blackboard.get("mouse_position"):
        return FAILURE
    return SUCCESS
The condition node will return a SUCCESS every time the ant is at the same position as the mouse. The inverter will invert it and make it FAILURE and when the parent Sequence node receives a FAILURE, it will abort the rest of the processing for this tick.
If on the other hand, if the ant is not at the same position as the mouse, the node will return a FAILURE, which the inverter will invert to SUCCESS, and the Selector node will now process the next child in queue. The next child node is and action node which is going to contain code to move the ant towards the mouse_position.
func tick(actor, blackboard) -> int:
    actor.move_towards_position(blackboard.get("mouse_position"), blackboard.get("delta"))
    return RUNNING
I can write the whole code of moving the ant in this action node, but it is always advisable to have some level of abstraction in your leaf node code. This is a very simple example, but as we will build more complex AI, you might be moving the character from within multiple action nodes, passing different parameters to affect the movement differently. In the above code, I am also getting "delta" from the blackboard and passing it on to my custom function that handles movement.
This should make your ant character look at and move towards the mouse_position every time the mouse is close enough to the ant. If the mouse moves farther away, the ant will stop moving. If the ant reaches the mouse position, then again it will stop moving.
I will be writing another post and extending the Behavior Tree to make a little ant simulation. Get the project files and checkout the MouseMove/MouseMoveScene.tscn. Hope this was helpful in understanding Behavior Trees a little bit. Let me know in the comments what you think.
Thanks for Reading!
~Vini
Featured Image by Fakurian Design on Unsplash
Comments